Help Article
Lifecycle of a Density Test

Purpose
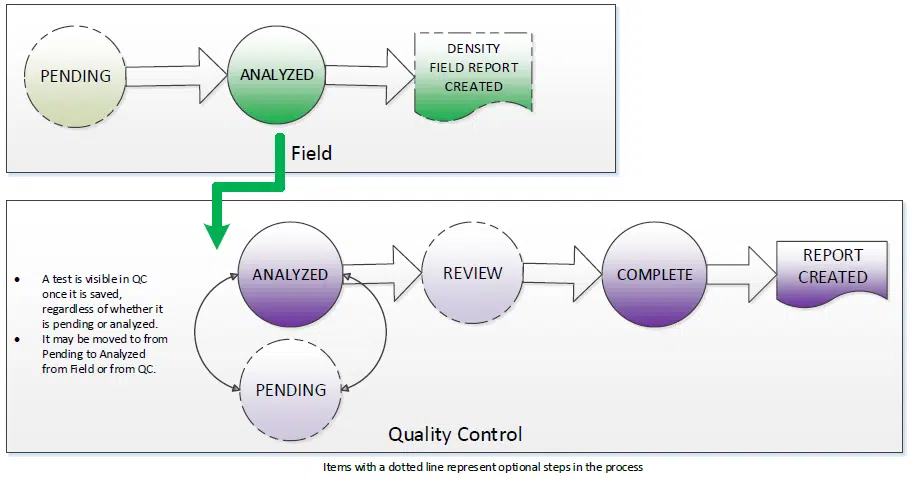
In the Field module, users can create and save density tests. Once saved, these tests enter the Review (QC) module to be analyzed, reviewed, and finally added to a client report. The graphic below shows each step of the density test lifecycle, including optional steps, like Pending tests and creating field reports.
For Field Staff
A field user creates a density test in [Field] > [Density Testing]. Two scenarios can occur:
- If the technician selects a specific proctor, the test is saved with status Analyzed.
- If the proctor is unknown or unavailable, the technician can select [Pending Proctor], saving the test with status Pending.

While a test is Pending, it can be edited in Field to add the proctor (or Max Density) and move it to Analyzed. Once a test reaches Complete status, it can no longer be edited in Field.
Field technicians may also generate an optional Density Field Report after saving the test, which can include one or many test records.

Exceptions:
- One-Point Density Tests: Always saved as Analyzed; cannot be Pending.
- Bituminous Nuclear Gauge Test: Status depends on whether the Supplied Max Density Value or Lab Max Density Value is present.
Review (QC) Module
Tests become visible in Review (QC) as soon as they are saved in Field. At this point, the project manager will see the test in Pending or Analyzed status. Pending tests can be updated in Review (QC) using the Edit icon (✏️), as well as in Field from [Manage Density Tests].


Project managers can also:
- Manually mark a test as Pending or Review to flag it for further attention.
- Note: A manually pending test does not always mean the proctor/max density is missing.
- Update a test to Complete once it has been reviewed. Only completed tests can be placed on a report.
- Once marked complete, the test is removed from the dashboard view.
Field: Sample Life Cycle Home Tile
The Field: Sample Life Cycle Home Tile provide visibility into density tests in the system. Users can reference this tile to track density tests as they move across the lifecycle. For more info on Home Tiles and how to add them to your home screen display, see the full Help Article.


Want to keep learning?
Click here for more how-to articles and MetaField guides. You can also access in-app guidance using the Help Desk!